viernes, 28 de octubre de 2016

TUTU SIN COSER Montessori / Montessori NO-SEW TUTU


(scroll down for English)


TUTU
Si, si en un ambiente Montessori


Los tutus son una gran adición para la vida de cualquier niño.

Se dice que en un ambiente Montessori no hay espacio para la imaginación y el juego libre. Por suerte no es más que una leyenda. Muchas escuelas Montessori promueven la imaginación, es más, disfrazarse, el juego simbólico y el jugo libre son parte de la vida escolar de los niños. Tanto si encontramos los disfraces en las aulas, en el patio o para obras de teatro os aseguro que serán horas de diversión y aprendizaje garantizadas. A continuación os enseño una forma fácil y barata para hacer vuestro propio tutu. Sin tener que coser!.


El coste de este DIY es de 4

Necesitarás:

· Tul
· Cinta para la cabeza con agujeros
· tijeras

 
Pasos:

Necesitarás tul. Asegúrate de que tu tul es de al menos 1 m de ancho y 3 metros  de largo, dependiendo del tamaño de tu cintura y la longitud del tutú. Puedes elegir o mezclar los colores de tu tul.

Dobla toda la pieza por la mitad y luego la mitad de nuevo como te muestro a continuación, también lo puedes dejar el desplegado, pero de esta manera vas más rápido al cortarlo.


 Cortar su material en tiras verticales de 5-10 cm cuando más amplias, más lleno parecerá tu tutu. El número de tiras dependerá de cuántos agujeros tiene tu banda para la cabeza en una fila ya que necesitaras una tira por cada agujero. Si quieres dos filas para que tu tutu aun quede más lleno lo tendrás que multiplicar por dos.

Coge cada tira y dóblala  por la mitad.


Ahora corta a través del pliegue así de una tira haremos dos.


Coge una tira de tul y dóblala por la mitad creando un lazo en un extremo con dos colas sueltas por el otro extremo.
       

Es hora de coger tu banda para la cabeza. Colócala en una silla como en la siguiente imagen para poder trabajar con más comodidad.


Pasar la tira plegada a través de uno de los agujeros de la parte inferior de la banda. Luego, coge la cola y pásala por dentro de la parte doblada .Para terminar tira de los extremos hasta que quede un nudo fuertemente.


Continuar llenando todos los agujeros de la fila inferior de tu banda para la cabeza.


Sí, es así de fácil, increíble ¿verdad? Y en menos de 30 minutos puede ser el orgulloso dueño de un precioso tutu.


NO-SEW TUTU
Yes in a Montessori environment


Tutus are great addition to any child's life. It is said that in a Montessori environment there is no room for imagination and free play fortunately this isn't true. Many Montessori schools promote imagination and dressing up and playing are part of children's school life. Whether you find them in the classroom , outdoors or for plays here is an easy inexpensive way to make your very own non-sew tutu. Hours of fun guaranteed.
The cost of this DIY is 4
You will need:
·         Tulle
·         Head band with holes
·         scissors

Steps:
You will need tulle. Make sure your tulle is at least 80 inches wide and 2 -3 yards long depending on the size of your waist and the length of the tutu. Choose or mix your own colours. The sky is the limit. I used red to suit my fox theme.
I folded my entire piece in half and then half again as shown below but you can also leave yours unfolded.
 Cut your material in vertical strips of 2-6 inches or wider for a fuller tutu. The number of strips will depend on how many holes your head band has in a row. You will need one strip for hole. If you want two rows times it by two.
Get each strip and fold it in halve.
   
Now cut through the fold cutting each strip into two.
         
Get a strip of tulle and fold it in half creating a loop on one end with two loose tails on the other.
       
Its time to get your Head band and place it on a chair like in the picture below. You can work comfortably this way.
Thread the folded strip through one of the bottom holes on your head band, with only a few inches of the loop end sticking out on the other side. Then, fold the tail ends under the head band and pull them through the loop tightly, creating a knot.
   
Continue filing all the bottom row holes on your head band.
   
Yes it’s that easy. And in less than 30 minutes you can be the proud owner of your very own no sew beautiful tutu.


jueves, 27 de octubre de 2016

Caja de sonidos Montessori DIY / Montessori phonetic box DIY


(scroll dowm for Engish)


La Caja de sonidos Montessori es uno de esos materiales que uno puede fabricar en casa. 

Originalmente se usan Las bolsitas phonicas o de sonidos como esta.


Las bolsitas en mi opinion son difíciles de mantener organizadas y complicadas para tenerlas a la vista del niño de una forma atractiva. Además creo que con la caja el niño inconscientemente ya puede empezar a hacerse una idea de las letras que existen en el abecedario de una manera mas visual y ordenada.

El coste de este DIY es de 10€


Materiales que vas a necesitar:

Organizador de plástico con cajones
Imprimible  (aqui en PDF)
Laminadora (no necesario)
Celo

Así es como se hace


Imprime las letras o haz tus propias . Intenta escoger un tipo de letra que concuerde con tus letras de lija.


Corta las. Lamina las y vuelve a cortarlas.


Ahora ayuda te de celo o de forro de libros para pegarlas en cada cajón.


Ya puedes empezar a llenarlas de objetos diminutos.


Si quieres ver su uso o presentación pincha aqui.


Montessori phonetic box DIY


Montessori alphabet box  is one of those materials that one can easily make at home.

Originally Montessori used phonetic pouches or sounds pouches like this one.


Phonetic bags in my opinion are difficult to keep organized and difficult to keep in sight of the child in an attractive way. I also believe that with the alphabetic box the child unconsciously can start to get an idea of ​​the letters in the alphabet in a more visual and orderly manner.

The cost of this DIY is 10 €


Materials you will need:

Organizer with plastic drawers
Printable letter template here
Laminator (not required)
Tape


How to do it:

Prints letters from the template or make your own. If you make your own try to use a font that matches your sandpaper letters.


Cut each letter out. Laminate and cut again.


The last thing you need to do is to stick them on with glue or tape.


You can start to fill the drawers with tiny objects.


If you want to how to use it and how to present it click here.


Presentación Caja de husos / Spindle box presentation


(scroll down for English)


Objetivo

Directo

El objetivo directo de la caja del husos es trabajar la idea de que los símbolos numéricos representan una cierta cantidad de objetos separados y que estos números siguen una secuencia natural. También trabajamos el concepto de cero y su símbolo.

Indirecto


Para reforzar la idea de que no hay otros símbolos distintos mas que de 0 a 9.


Control de Error


Si han contado de forma incorrecta, al final habrá un número insuficiente de husillos o habrán husillos de mas.


Edad


3 años en adelante (después de que el niño ha trabajado con las barras numéricas y números de lija )


Presentación


  1. Introducir al niño la caja de husos en la estantería e invítalo a tráelo a la alfombra de trabajo.
  2. Señalar los compartimentos y sus números. Señálalos uno por uno en orden y pide al niño que de los nombres de los números.
  3. Dígale al niño que estos números nos dicen cuantos husos / palos tendremos que poner en cada compartimento.
  4. Señala el número 1. Decimos "uno" y luego decimos : "Vamos a poner 1 husillo en este compartimento."
  5. Coloca un husillo o palo en el compartimento.
  6. Repita para el numero 2, contando los husillos a medida que los colocas, "Uno, dos."
  7. Invita al niño a que coloque los husillos restantes en cada compartimento. 
  8. Una vez todos los husos se han colocado, miraremos al compartimento del numero 0 y podemos señalar que no hay nada en el.Diremos : "Este es cero. Cero significa nada. Es por eso que no hay nada en este lugar.
  9. Ahora coge el palito del numero 1 y devuélvelo a su lugar inicial. Invita al niño a que siga hasta que todos los palitos estén en su compartimento inicial y todos los compartimentos con números vacíos.
  10. Devuelve el material a su lugar en la estantería.


Spindle box presentation


Purpose

Direct

The purpose of the Spindle box is to help the child understand the concept that each number symbol represents a certain quantity of separate untis. It also helps the child see ina visual form that numbers follow a natural sequences. It is also the perfect activity to reinfors the concept of zero.

Indirect

Fine Motor skills.


Control of Error

If the child has made a mistake counting the spindles, at the end there will be either an insufficient number of spindles or some spindles left over.

Age

3 years onwards (after the child has worked with the number rods and card numbers)

Presentation
  1. Introduce the child to the material on the shelf and invite him to bring it over to the mat.
  2. Point out each compartments and it's numerals. Point to them one at a time, and ask the child to give the number’s names.
  3. Tell the child that these numbers are the indicators of how many spindles/sticks we will need to place in each compartment.
  4. Point to number 1. Ask the child to read it.Now you can say, “We will put 1 spindle in this compartment.”
  5. Place one spindle in the compartment.
  6. Repeat for 2, counting the spindles out loud as you place them, “One, two.” 
  7. Invite the child to continue with the folowing numbers untill he places the correct spindles in the remaining compartments.
  8.  Once all of the spindles have been placed in the correct compartments, notice the compartment with the symbol ´0` and point out that there is nothing in it. You can now tell the child “This is zero. Zero means nothing. That is why there is nothing in this spot"
  9. Ask the child to get the one spindle placed at the number 1 compartment and put i back in the last compartment where all the spindle were stored before starting the activity. Then number 2 , 3 and the rest of the remaining compartment.
  10. Once finished ask the child to take the material back to its place on the shelf. 


miércoles, 26 de octubre de 2016

Caja de husos Montessori DIY / Montessori Spindle Box DIY


(Scroll down for English)

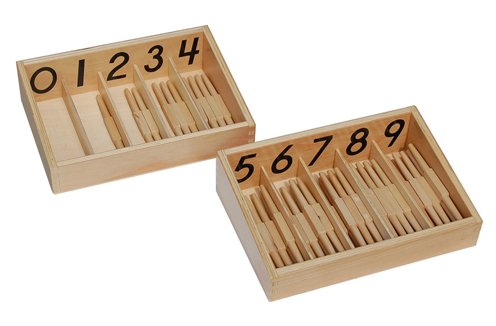
Los materiales Montessori pueden llegar a ser bastante caros. Vale la pena comprar algunos pero otros ,como la caja de husos , nos lo podemos hacer nosotros por una fracción del precio original.

El coste de este DIY es de 14 €.


El objetivo de la caja de husos  es aclarar la idea de que los símbolos numericos representan una determinada cantidad de objetos separados.También nos sirve para introducir el concepto de cero y para reforzar el concepto de que los números siguen una secuencia natural.
Para ver como presentar esta actividad Montessori pincha aqui.


Vas a necessitar:


  • Caja/s (con un total de 11 o 12 compartimentos)
  • Palos de madera para manualidades
  • Números de Madera
  • Sierra para madera


Una vez adquirido todo el material nos podemos poner manos a la obra porque os aseguro que no hay un material mas fácil y rápido de hacer que este. Yo encontré una caja de madera muy chula con 6 compartimentos, Así que compre 2. 

Para saber cuantos palos de manualidades tendrás que comprar tendrás que tener dos factores en cuenta. La longitud de tus compartimentos en relación con la longitud de los palos de madera y la cantidad de palitos o usos que necesitas en total.

El total de husos que vamos a necessitar es de 45 lo cual es la suma de : 0+1+2+3+4+5+6+7+8+9 , pero siempre puedes hacer par mas de extras por si alguno se pierde. Los extras guardalos a parte para no confundir al niño.

Teniendo en cuenta todo esto yo he cortado mis palos de 30 cm en palitos de 10 cm de longitud cada uno. 

Primero marca los 


Una vez marcados ya puedes empezar a cortar. Una sierra de mano como esta te ira bien.


Ahora que ya tienes todos tus palos cortados es hora de lijar los extremos para que quede bien acabad


Como  en mi caja de madera  me sobran compartimentos he sacado uno de los separadores para que así mis husos/palos quepan con mas comodidad y así también no me sobra ningún compartimento.


Lo último que tienes que hacer es pegar tus números en cada compartimento con cola blanca. Yo he pintado los mios todos del mismo color.


Ya tienes tu Caja de husos Montessori DIY. Disfrutala.


Montessori Spindle box DIY


Montessori materials can be quite expensive. Some of them are worth buying but others like the spindle box  can be built  for a fraction of the original price. 

The cost of this DIY is 14 €.


The aim of the spindle box is to clarify the idea that the symbols represent a certain quantity of separate objects. We can also use it to introduce the concept of zero and to reinforce the natural sequence of the numerals.
To see how to present this activity Montessori click here.


You'll need:

Box  (with a total of 11 or 12 compartments)
Wooden craft sticks
Wooden  numbers
Saw


Now that you have everything you need you can start working . I assure you , there is no easier and faster Montessori material to DIY than this one. I found a very cool wooden box with 6 compartments, so I had to buy two which is not ideal but It works.

To know how many  spindle, wooden craft sticks in this case, you have to buy you will need to have two factors in consideration. The length of your compartments in relation to the length of the wooden sticks and the amount of sticks you need  in total.

You will  need a total of  45 spindles which is the sum of: 0 + 1 + 2 + 3 + 4 + 5 + 6 + 7 + 8 + 9, but you can always do some extras in case you loose some. Don't keep the extras inside your box it will confuse the child.

Taking all this factors into account I cut my 30 cm in length sticks into  10 cm sticks.

First mark your sticks at your desired length like this.


Once have marked  your sticks you can start cutting. A handsaw like this one will do just fine.


Now that you have all your sticks cut at the correct length  is time to smooth the edges with sandpaper to make sure that your child will not get any splinters.


 You need to have a minimum of 10 compartments for numbers from 0 to 9. I had 12 compartments so I turned my 2 extra ones into the storage for my spindles. Taking out one of the separators. If you only have 10 compartments you can store your spindles or sticks into a basket next to the box.


Last thing you need to do  is stick your numbers in each compartment with white craft glue. I painted mine all the same color.


And your  DIY Montessori spindles box is ready. Enjoy it.